F5 Firewall Solutions > [Archive2] F5 BIG-IP DDoS and DNS DoS Protections > Module 2 – Detecting and Preventing System DoS and DDoS Attacks Source | Edit on
Detecting and Preventing System DoS and DDoS Attacks
Configure Logging
Configuring a logging destination will allow you to verify the BIG-IPs detection and mitigation of attacks, in addition to the built-in reporting.
In the BIG-IP web UI, navigate to Security > DoS Protection > Device Configuration > Properties.
Under Log Pubisher, select local-db-publisher.
- Click the Commit Changes to System button.

Simulating a Christmas Tree Packet Attack
In this example, we’ll set the BIG-IP to detect and mitigate an attack where all flags on a TCP packet are set. This is commonly referred to as a Christmas tree packet and is intended to increase processing on in-path network devices and end hosts to the target.
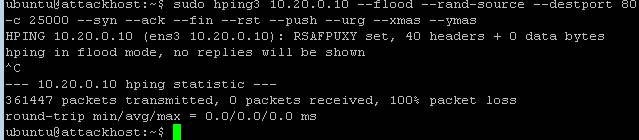
We’ll use the hping utility to send 25,000 packets to our server, with random source IPs to simulate a DDoS attack where multiple hosts are attacking our server. We’ll set the SYN, ACK, FIN, RST, URG, PUSH, Xmas and Ymas TCP flags.
In the BIG-IP web UI, navigate to Security > DoS Protection > Device Configuration > Network Security.
Expand the Bad-Header-TCP category in the vectors list.
Click on the Bad TCP Flags (All Flags Set) vector name.
Configure the vector with the following parameters:
State: Mitigate
Threshold Mode: Fully Manual
Detection Threshold EPS: Specify 50
Detection Threshold Percent: Specify 200
- Mitigation Threshold EPS: Specify 100
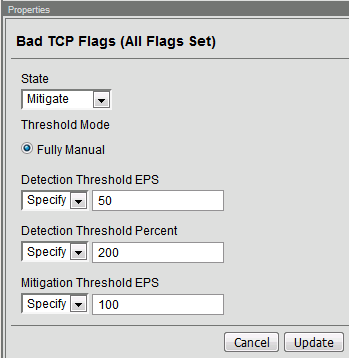
Click Update to save your changes.
Open the BIG-IP SSH session and scroll the ltm log in real time with the following command: tail -f /var/log/ltm
- On the attack host, launch the attack by issuing the following command on the BASH prompt:sudo hping3 10.20.0.10 –flood –rand-source –destport 80 -c 25000 –syn –ack –fin –rst –push –urg –xmas –ymas
- You’ll see the BIG-IP ltm log show that the attack has been detected:

- After approximately 60 seconds, press CTRL+C to stop the attack.
- Return to the BIG-IP web UI. Navigate to Security > Event Logs > DoS > Network > Events. Observer the log entries showing the details surrounding the attack detection and mitigation.

Navigate to Security > Reporting > DoS > Analysis. Single-click on the attack ID in the filter list to the right of the charts and observe the various statistics around the attack.
Simulating a TCP SYN DDoS Attack
In the last example, we crafted a packet that is easily identified as malicious, as its invalid. We’ll now simulate an attack with traffic that could be normal, acceptable traffic. The TCP SYN flood attack will attempt to DDoS a host by sending valid TCP traffic to a host from multiple source hosts.
In the BIG-IP web UI, navigate to Security > DoS Protection > Device Configuration > Network Security.
Expand the Flood category in the vectors list.
Click on TCP Syn Flood vector name.
Configure the vector with the following parameters (use the lower values specified):
State: Mitigate
Threshold Mode: Fully Manual
Detection Threshold EPS: 50
Detection Threshold Percent: 200
- Mitigation Threshold EPS: 100
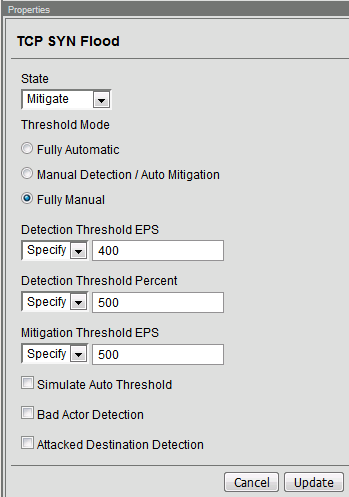
Click Update to save your changes.
Open the BIG-IP SSH session and scroll the ltm log in real time with the following command: tail -f /var/log/ltm
- On the attack host, launch the attack by issuing the following command on the BASH prompt:sudo hping3 10.20.0.10 –flood –rand-source –destport 80 –syn -d 120 -w 64
After about 60 seconds, stop the flood attack by pressing CTRL + C.
Return to the BIG-IP web UI and navigate to Security > Event Logs > DoS > Network > Events. Observe the log entries showing the details surrounding the attack detection and mitigation.
Navigate to Security > Reporting > DoS > Dashboard to view an overview of the DoS attacks and timeline. You can select filters in the filter pane to highlight the specific attack.
Finally, navigate to Security > Reporting > DoS > Analysis. View detailed statistics around the attack.
Preventing Global DoS Sweep and Flood Attacks
In the last section, the focus was on attacks originating from various hosts. In this section, we will focus on mitigating flood and sweep attacks from a single host.
Single Endpoint Sweep
The single endpoint sweep is an attempt for an attacker to send traffic across a range of ports on the target server, typically to scan for open ports.
In the BIG-IP web UI, navigate to Security > DoS Protection > Device Configuration > Network Security.
Expand the Single-Endpoint category in the vectors list.
Click on Single Endpoint Sweep vector name.
Configure the vector with the following parameters:
State: Mitigate
Threshold Mode: Fully Manual
Detection Threshold EPS: 150
Mitigation Threshold EPS: 200
Add Source Address to Category: Checked
Category Name: denial_of_service
Sustained Attack Detection Time: 10 seconds
Category Duration Time: 60 seconds
- Packet Type: Move All IPv4 to Selected
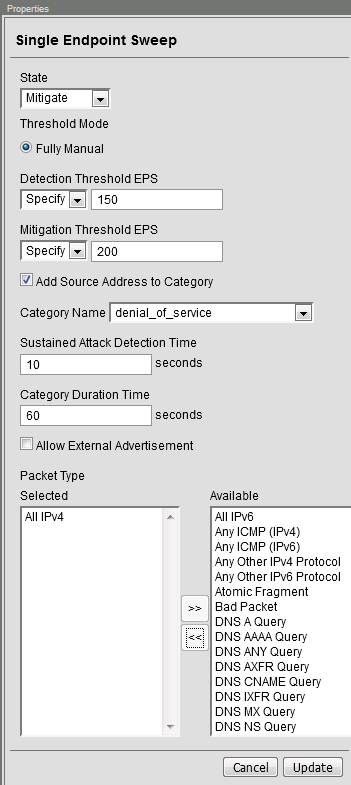
Click Update to save your changes.
Navigate to Security > Network Firewall > IP Intelligence > Policies.
- In the Global Policy section, change the IP Intelligence Policy to ip-intelligence.
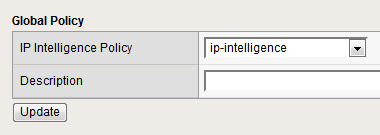
Click Update.
Click on the ip-intelligence policy in the policy list below.
Create a new Blacklist Matching Policy in the IP Intelligence Policy Properties section with the following attributes, leaving unspecified attributes with their default values:
- Blacklist Category: denial-of-service
- Action: drop
- Log Blacklist Category Matches: Yes
- Click Add to add the new Blacklist Matching Policy.
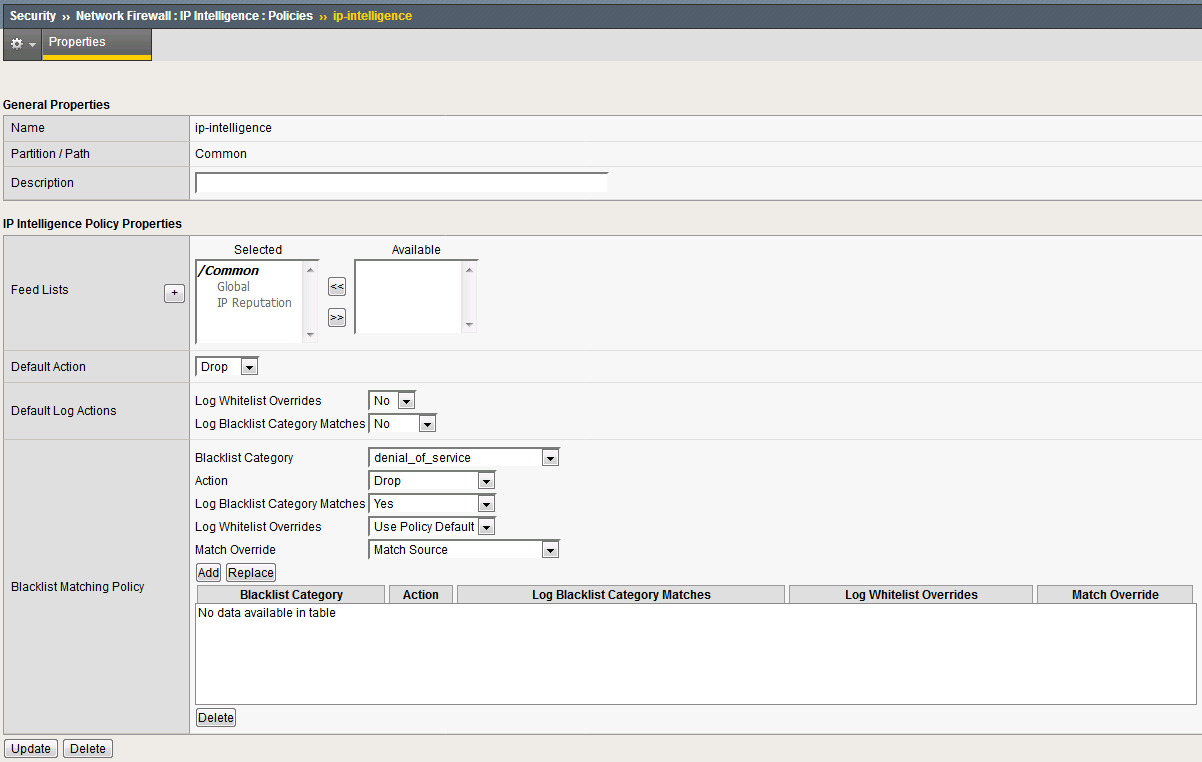
Click Update to save changes to the ip-intelligence policy.
Open the BIG-IP SSH session and scroll the ltm log in real time with the following command: tail -f /var/log/ltm
On the victim server, start a packet capture with an SSH filter by issuing sudo tcpdump -nn not port 22
- On the attack host, launch the attack by issuing the following command on the BASH prompt:sudo hping3 10.20.0.10 –flood –scan 1-65535 -d 128 -w 64 –syn
You will see the scan find a few open ports on the server, and the server will show the inbound sweep traffic. However, you will notice that the traffic to the server stops after a short time (10 seconds, the configured sustained attack detection time.) Leave the test running.
After approximately 60 seconds, sweep traffic will return to the host. This is because the IP Intelligence categorization of the attack host has expired. After 10 seconds of traffic, the bad actor is again blacklisted for another 60 seconds.
Stop the sweep attack on the attack host by pressing CTRL + C.
Return to the BIG-IP web UI and navigate to Security > Event Logs > DoS > Network > Events. Observe the log entries showing the details surrounding the attack detection and mitigation.
Navigate to Security > Event Logs > Network > IP Intelligence. Observe the log entries showing the mitigation of the sweep attack via the ip-intelligence policy.
Navigate to Security > Event Logs > Network > Shun. Observe the log entries showing the blacklist adds and deletes.
Navigate to Security > Reporting > Network > IP Intelligence. Observe the statistics showing the sweep attack and mitigation. Change the View By drop-down to view the varying statistics.
Navigate to Security > Reporting > DoS > Dashboard to view an overview of the DoS attacks and timeline. You can select filters in the filter pane to highlight the specific attack.
Finally, navigate to Security > Reporting > DoS > Analysis. View detailed statistics around the attack.
Single Endpoint Flood
The single endpoint flood attack is an attempt for an attacker to send a flood of traffic to a host in hopes of overwhelming a service to a point of failure. In this example, we’ll flood the target server with ICMP packets.
In the BIG-IP web UI, navigate to Security > DoS Protection > Device Configuration > Network Security.
Expand the Single-Endpoint category in the vectors list.
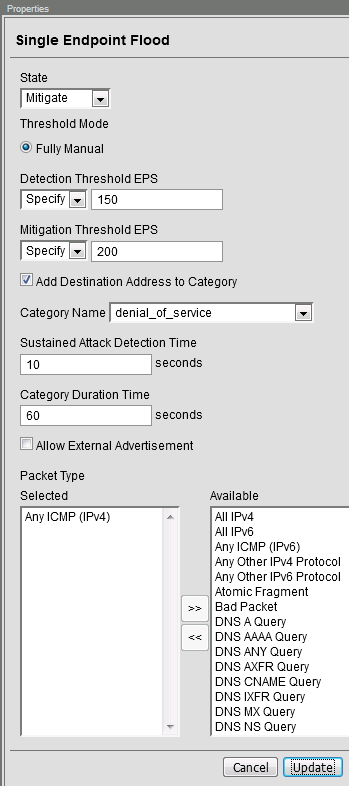
Click on Single Endpoint Flood vector name.
Configure the vector with the following parameters:
State: Mitigate
Threshold Mode: Fully Manual
Detection Threshold EPS: 150
Mitigation Threshold EPS: 200
Add Destination Address to Category: Checked
Category Name: denial_of_service
Sustained Attack Detection Time: 10 seconds
Category Duration Time: 60 seconds
- Packet Type: Move Any ICMP (IPv4) to Selected
Click Update to save your changes.
Open the BIG-IP SSH session and scroll the ltm log in real time with the following command: tail -f /var/log/ltm
We’ll run a packet capture on the victim server to gauge the incoming traffic. On the victim server, issue the following command: sudo tcpdump -nn not port 22
- On the attack host, launch the attack by issuing the following command on the BASH prompt:sudo hping3 10.20.0.10 –faster -c 25000 –icmp
The attack host will begin flooding the victim server with ICMP packets. However, you will notice that the traffic to the server stops after a short time (10 seconds, the configured sustained attack detection time.)
After approximately 60 seconds, run the attack again. ICMP traffic will return to the host. This is because the IP Intelligence categorization of the attack host has expired.
Return to the BIG-IP web UI.
Navigate to Security > Event Logs > DoS > Network > Events. Observe the log entries showing the details surrounding the attack detection and mitigation.
Navigate to Security > Event Logs > Network > IP Intelligence. Observe the log entries showing the mitigation of the sweep attack via the ip-intelligence policy.
Navigate to Security > Reporting > Network > IP Intelligence. Observe the statistics showing the sweep attack and mitigation.
Navigate to Security > Reporting > DoS > Dashboard to view an overview of the DoS attacks and timeline. You can select filters in the filter pane to highlight the specific attack.
Finally, navigate to Security > Reporting > DoS > Analysis. View detailed statistics around the attack.
Conclusion
Congratulations on finishing the lab!
This lab did not cover auto thresholds for protections, nor did we test dynamic signatures. Testing auto thresholds requires a more real-world environment. For suggested testing guidelines for auto thresholds and dynamic signatures, engage your F5 account team.
This concludes the DoS/DDoS portion of the lab. You may now close all sessions, log out of the jump host and log out of the training portal.
Thank you for your time.